Working with WordPress: The Basics
In last week’s post, we installed WordPress onto your BlueHost hosting account, but now let’s have some fun and dive into some WordPress basics!
What you will learn:
- Upload your website theme
- Creating a page and post
- Creating a navigation bar
- Sidebar with widgets
- Installing plugins
Website Theme
Some of you may or may not have a website theme/template, but if you don’t… no worries, I just want to make sure you understand the process of installing and activating your theme. Plus, you can’t see what your blog looks like to readers without a theme in place. For this post, we will use a default theme that’s included within WordPress and when we get to the post on custom themes you can change it then (if you want).
WordPress comes with a few default themes. The theme that’s currently active when you first install is called: Twenty Fifteen.
The following steps show you how to change your theme:
1. Click Appearance » Theme on the left-hand side of your WordPress dashboard.
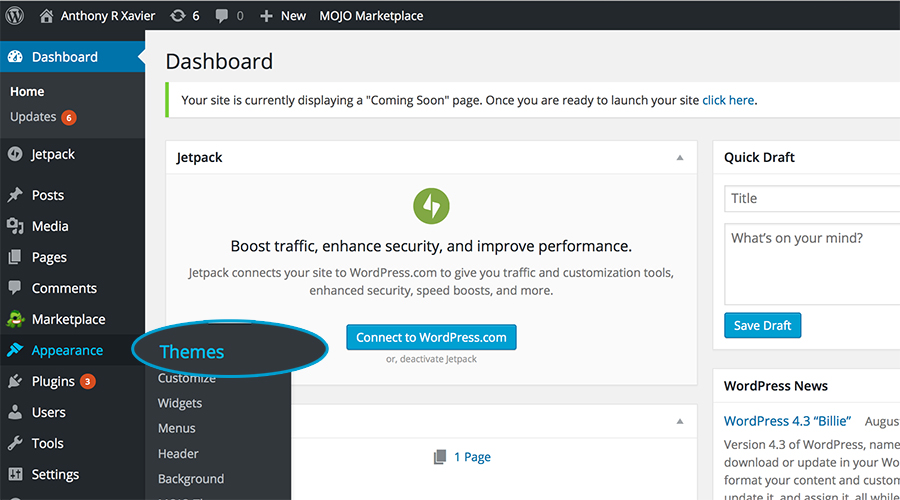
2. Once you are on the Themes page, click Add New
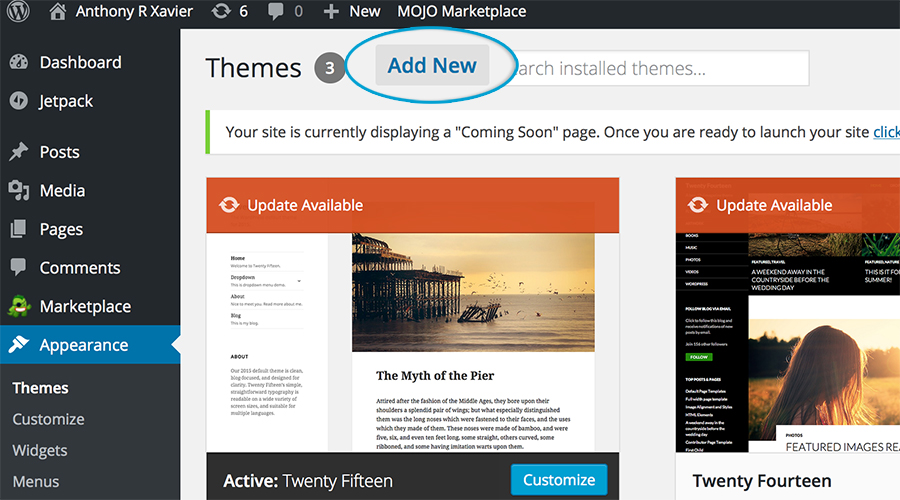
3. The next screen will provide you with two options. 1) You can choose a theme from the list of options WordPress provides or 2) Upload your own theme. Let’s choose one of the themes from the selections below. Once you find your theme, select install.

4. WordPress will now install your theme. Once successfully installed, you need to activate the theme in order to see the changes on your website.
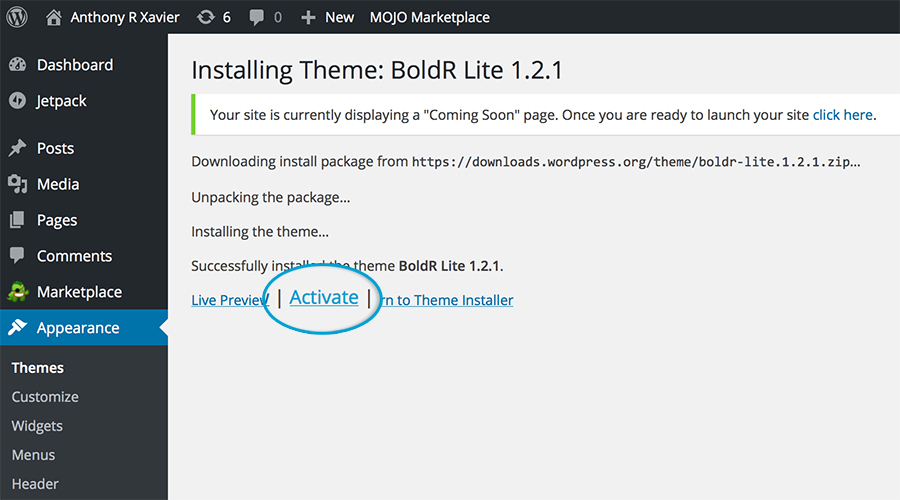
I will be explaining how to upload your own theme later in this series… it’s basically the same process, but instead of selecting a theme from the WordPress options, we will be selecting Upload Theme.

Select the location of your theme via the Browse option and click Install.
WordPress Theme done and done… not so difficult right?
Creating a Page or Post
This is the start of your content, aka pretty important!
When creating content, you have two options: Page or Post
Page
A page is typically used to display information.
Examples:
- About Me
- Contact
- Features
It’s different from a Post because:
- Doesn’t display the date the page was created
- Cannot be categorized
- Not created as frequent
- And I usually turn off the ability to leave comments (except for About Me page)
- Not pushed to RSS feeds
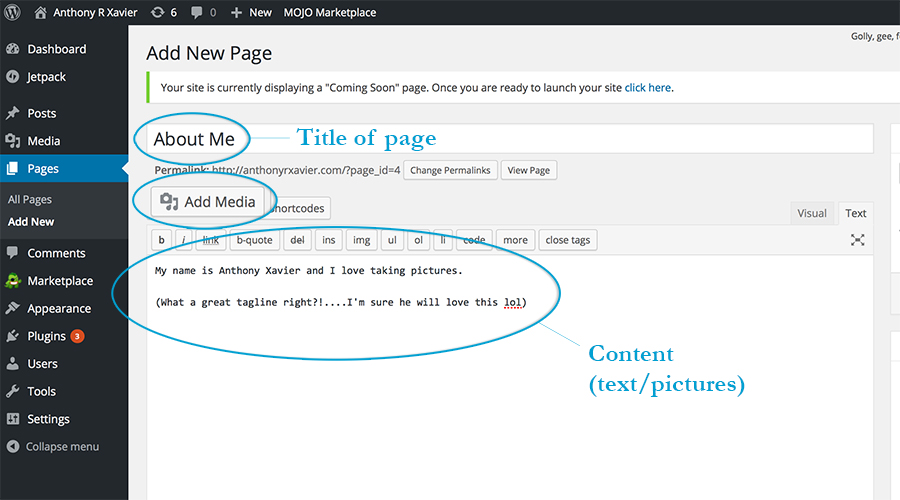
1. Click Page » Add new on the left-hand side of your WordPress dashboard.
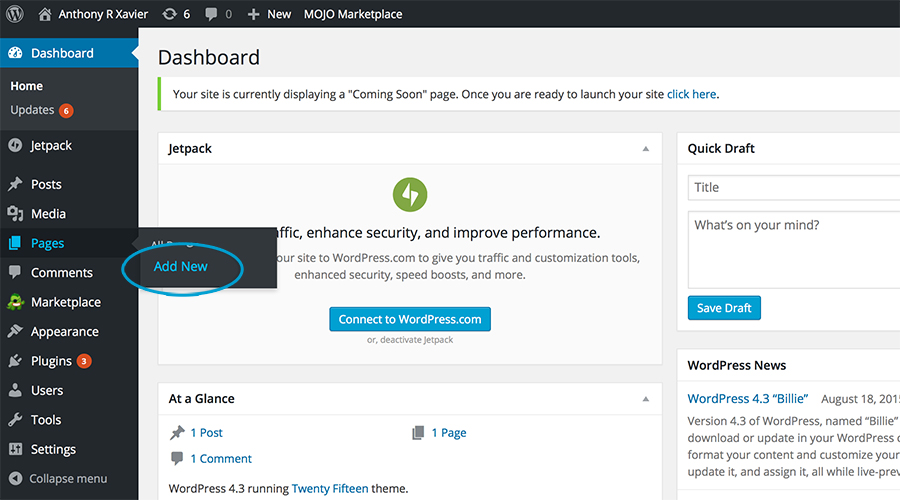
2. Add a title to your page and some content. In this example we are also going to add an image. Click Add Media then drag and drop your image into the box.
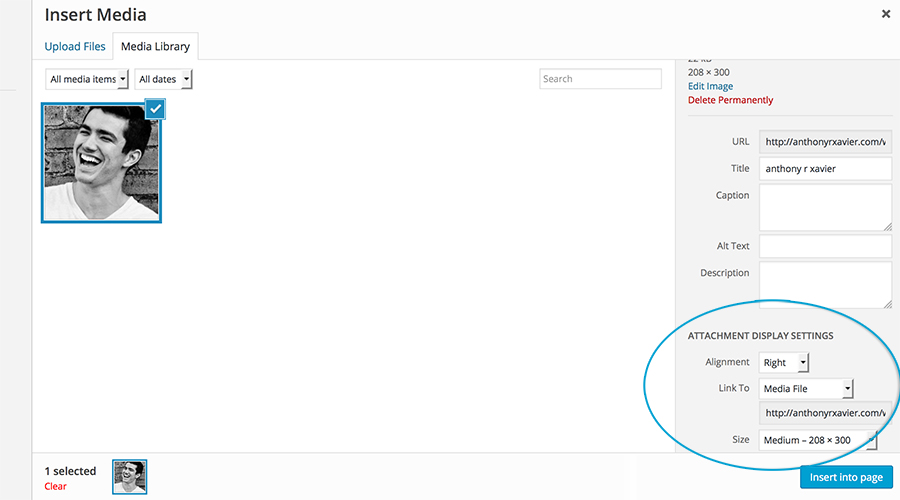
3. Once added, you will want to select your picture and then customize your settings to the right. Here you can choose your picture alignment, have your picture linked or not, and also pick the dimension size as to what you would like your picture to be.
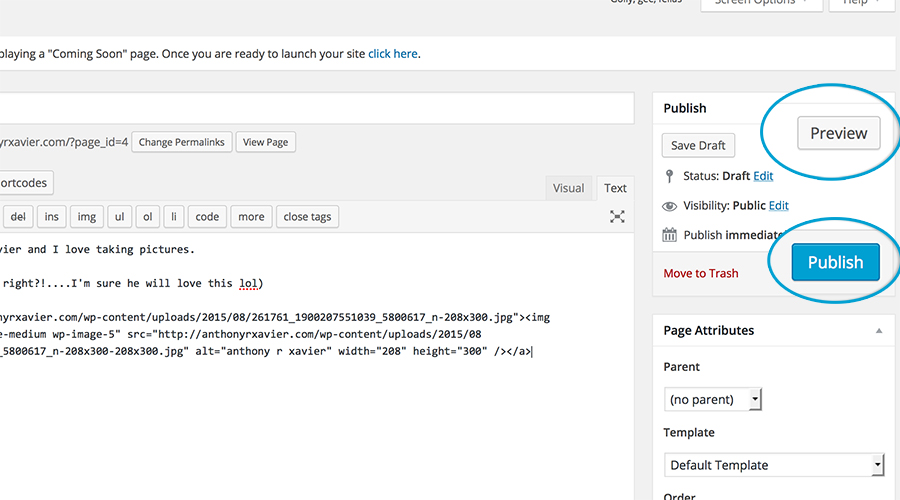
4. After you’re done creating your page, you’ll want to click Preview. This will show you how your page will look without making it live within your site. If everything looks good, hit Publish.
Post
The majority of your content will be formatted on a blog “post”
Different from a Page because:
- Constantly being updated with new topics and information
- Can be categorized by date, topic and tags
- Pushed to RSS feeds
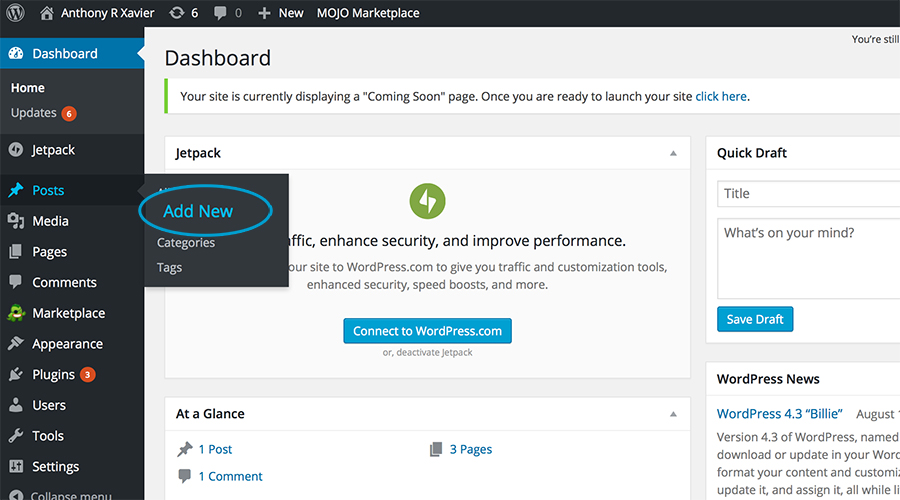
1. It’s a very similar process to creating a page. Actually, almost exactly the same except – Click Post » Add new on the left-hand.
2. Add you title and content.
3. Being that this is a post, you will need to add a category. I created a category called Blogging Tips, then checked it.

As you start creating content, make sure to appropriately categorize your posts. This will not only help your visitors when navigating your blog, but also helps in SEO (Search Engine Optimization).
Navigation bar – Your menu
The navigation bar is what your visitors will use to get around your blog and will change multiple times as you grow and have a better understanding of the wants and needs of your audience.
You can customize your bar with links to:
- Pages (Home, About, Contact)
- Categories (Blog posts on Fashion, Street Style, Beauty)
- Or other custom links (For example, linking to another fashion related website)
- Social
Keep in mind, you always want to make sure you have these tabs:
- Home – Links to your URL, easy way for visitors to get back to your homepage.
- About – Give insight to who you are and what your blog is about. (Go back to the Finding Your Niche post as a reference)
- Contact – Provide a way for others to get in touch with you. (Readers, Companies looking for collaborations, etc.)
- Follow (or Social)
1. Click Appearance » Menu on the left-hand side of your WordPress dashboard.
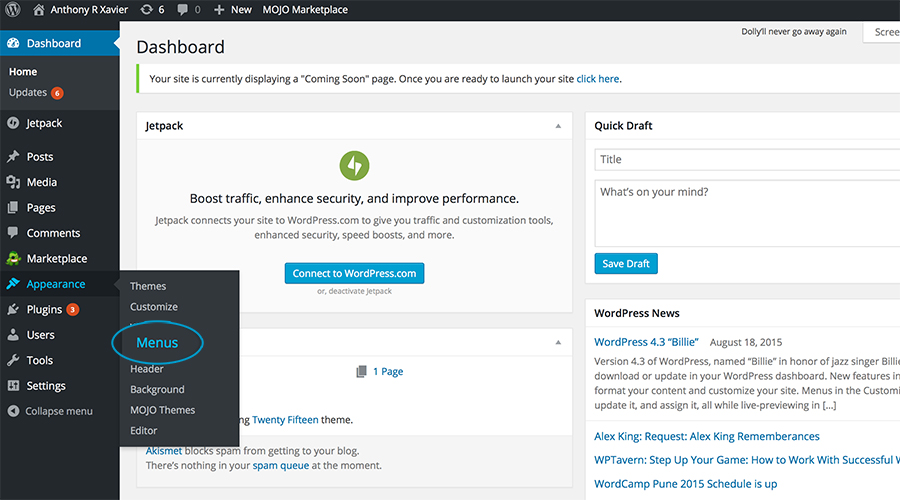
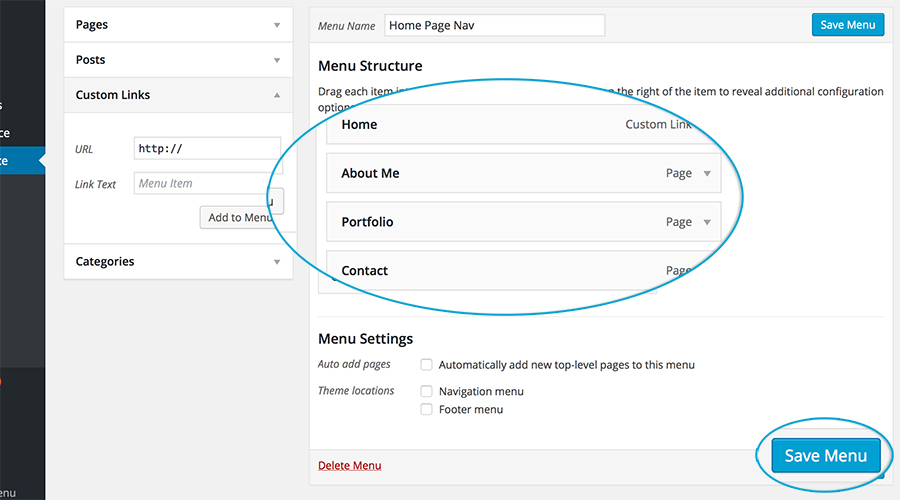
2. Add a Menu Name, for this I will use “Home Page Nav”. Then click Create Menu.
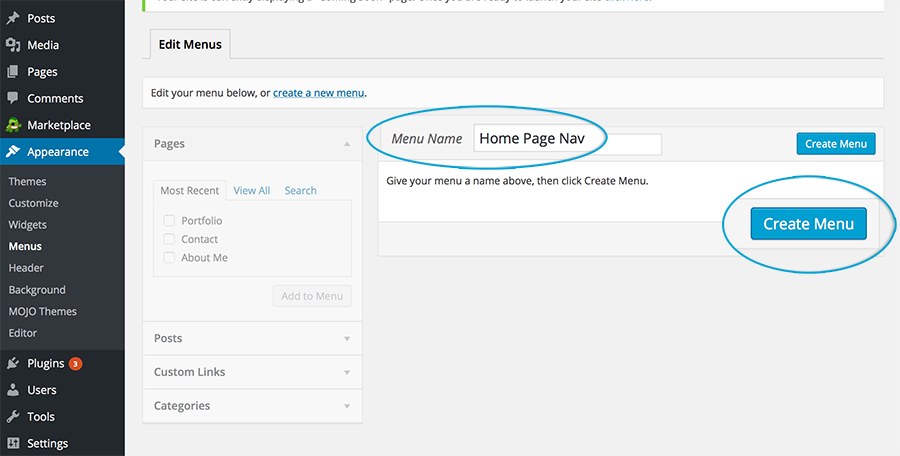
3. Select the Pages you would like to add to your menu. You can also select certain categories or add custom links.
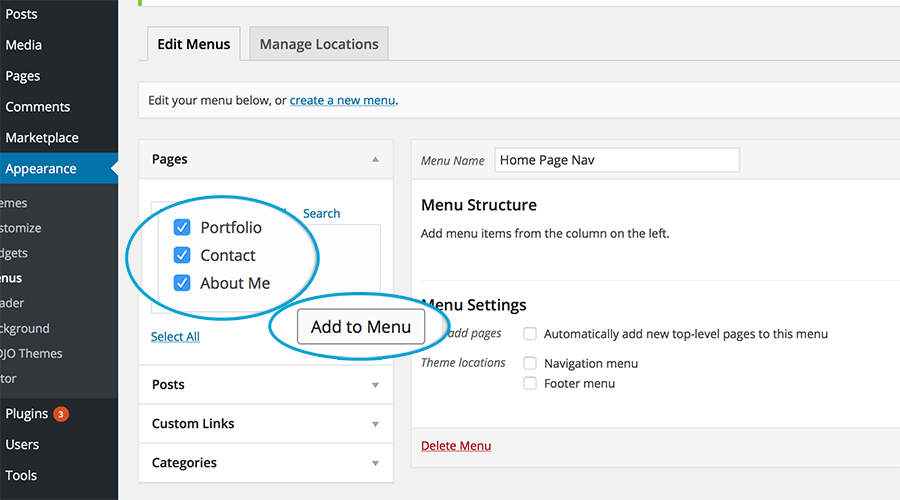
4. Let’s add a custom link, which will link to your domain. For example, I’m linking the Home tab to www.anthonyrxavier.com.
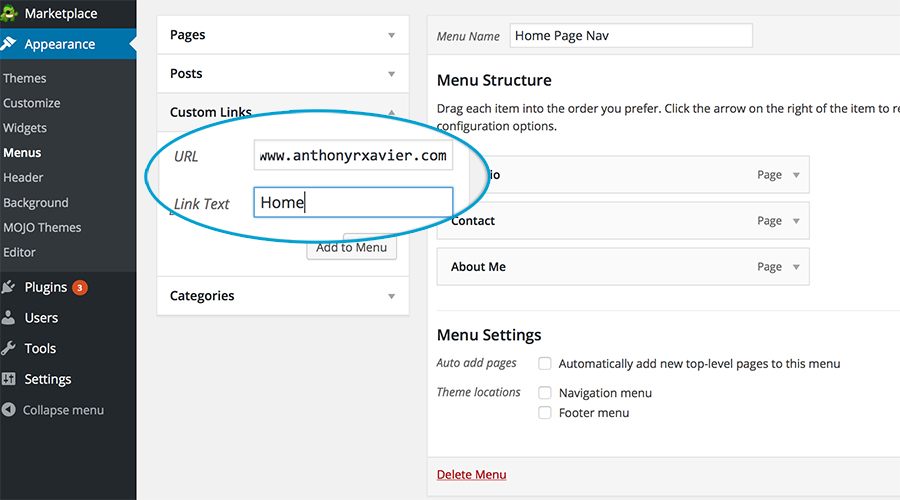
5. A great part about this tool is that you can rearrange the tabs within your menu fairly easy. Just drag and drop in the order you would like it to appear on your site. Once you have it the way you want it, click Save Menu.
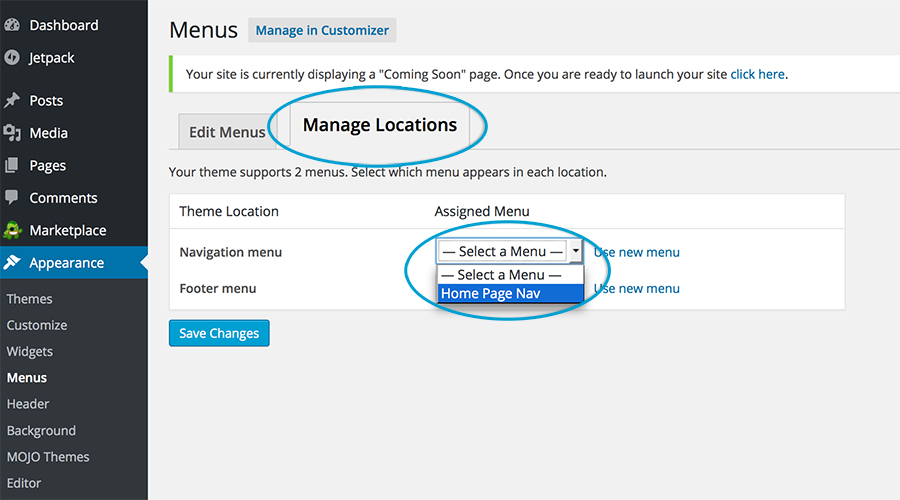
6. Once saved, click on the tab labeled Manage Locations. Then on the Navigation Menu select the menu you just saved. Based on your theme, you may want different menus for the Navigation and Footer. But for this example, I will use the same menu for both.
See the menu I created for my hubby’s test blog at www.anthonyrxavier.com
Sidebar with Widgets
The sidebar is the area displayed on the left or right-hand side of your content. (some websites have them on both sides) and you will notice on my blog- I have my sidebar to the right.
It provides additional space for value added features like:
- Search bar
- Blog tagline
- Social media icons
- Popular posts
- Ads
The great thing about the sidebar is that it’s completely up to you what you want to add! I would just make sure everything serves a purpose or adds value to your readers.
Sidebars are made possible through the use of Widgets.
Widgets simply allow you to remove, add or rearrange the features mentioned above without any coding experience.
WordPress has it’s own default set of widgets, but depending on the template you choose for your website, there could be more added in conjunction with your theme.
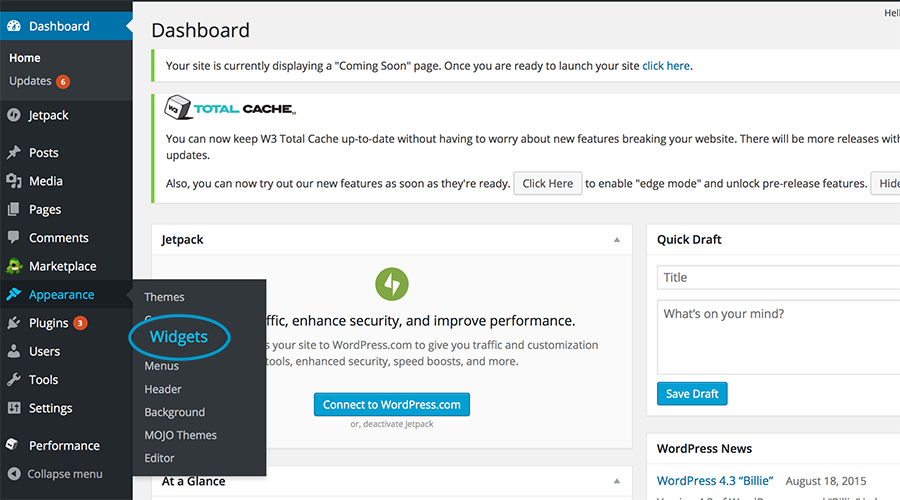
1. To customize your sidebar, click Appearance » Widgets on the left-hand side of your WordPress dashboard.
2. The widget menu will provide a list of available widgets that go along with your website’s theme (on the left). The widgets you currently see below are the default widgets that comes with WordPress. Pick and choose which widgets you would like to see in your sidebar and just drag & drop (to the right). Same concept as with the Navigation bar, you are able to rearrange into any order you choose.
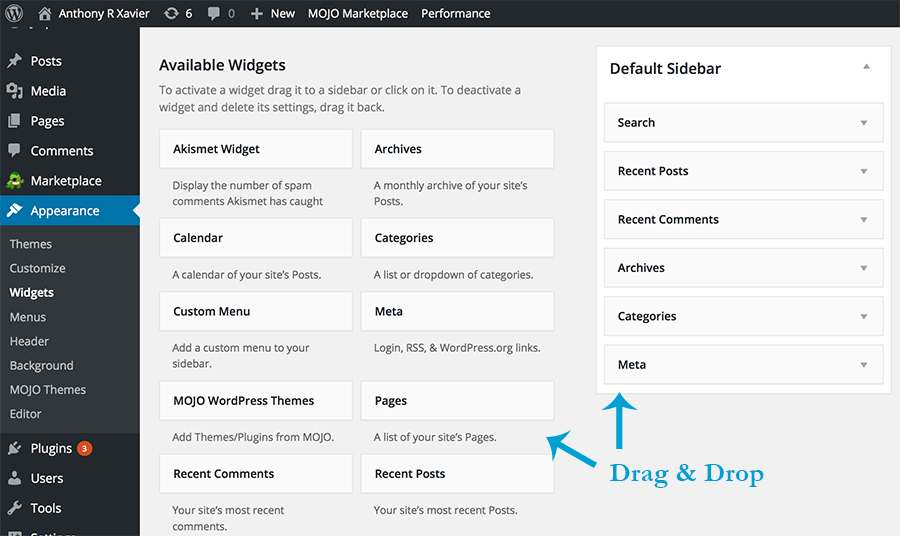
3. As you drag a particular widget over, you may notice that you are presented with a few customization options.
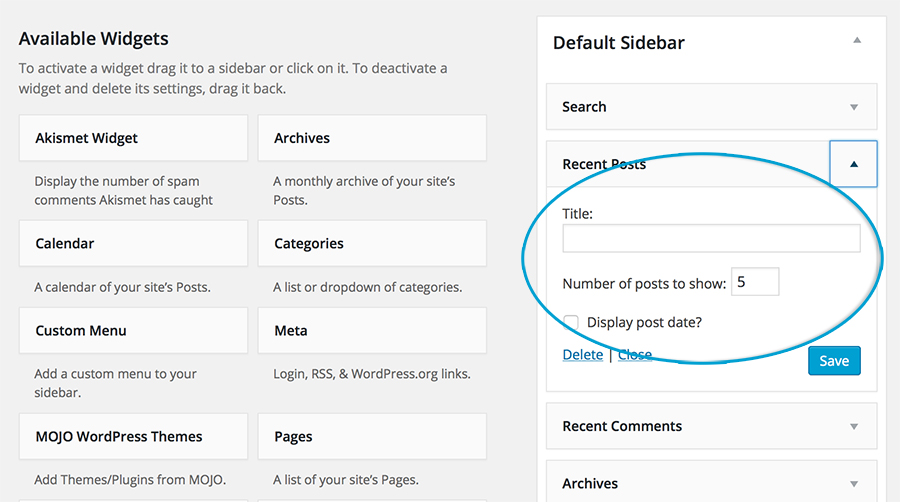
4. Once you add your content, click Save and your blog is automatically updated, just refresh your blog URL to see if you like how the new layout looks.
Installing Plugins
Plugins are small programs that enhance the functionality of your WordPress website. There are thousands of plugins (some free and others not) that have a wide range of features such as:
- Increase WordPress security
- Enhance and facilitate SEO
- Optimize images
- Social Media sharing
If you have a feature or functionality in mind that you want to add to your blog, more than likely there is a plugin for it. I have 15+ plugins right now that help run my blog.
Remember, plugins are only available to add through a Self-Hosted WordPress website (WordPress.org), not WordPress.com (Read my previous article that explains the difference WordPress.org vs WordPress.com)
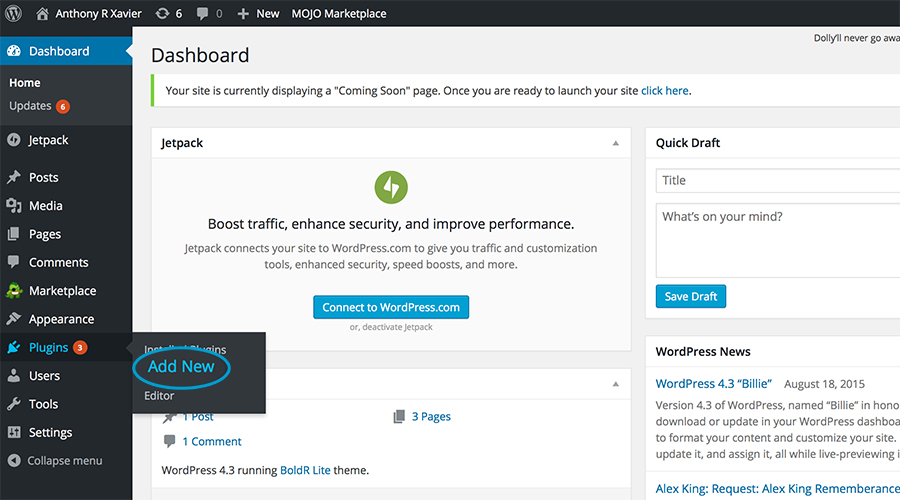
1. You know the drill…click Plugins » Add new on the left-hand side of your WordPress dashboard.
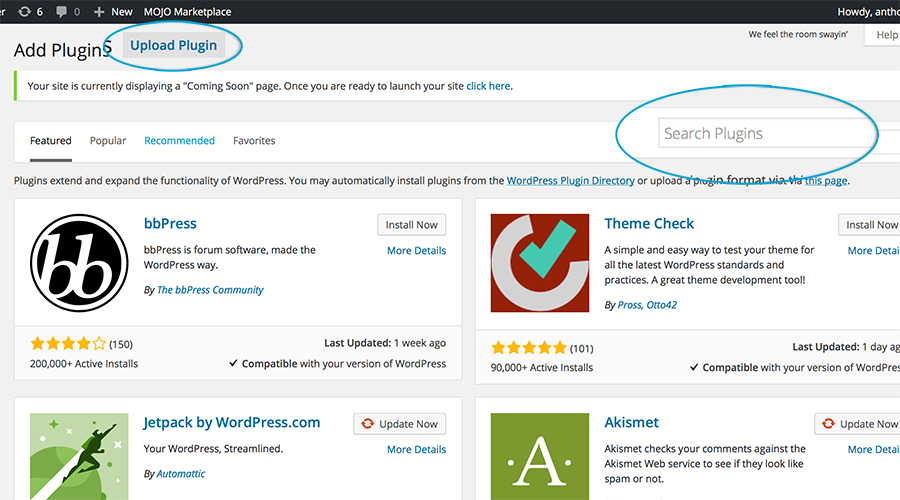
2. Adding a plugin is similar to adding a theme. You have the option of either uploading or searching within WordPress’s database. For this example, we will be searching for “W3 Total Cache”. This plugin helps with your overall website’s speed. Type “W3 Total Cache” within the “Search” field.
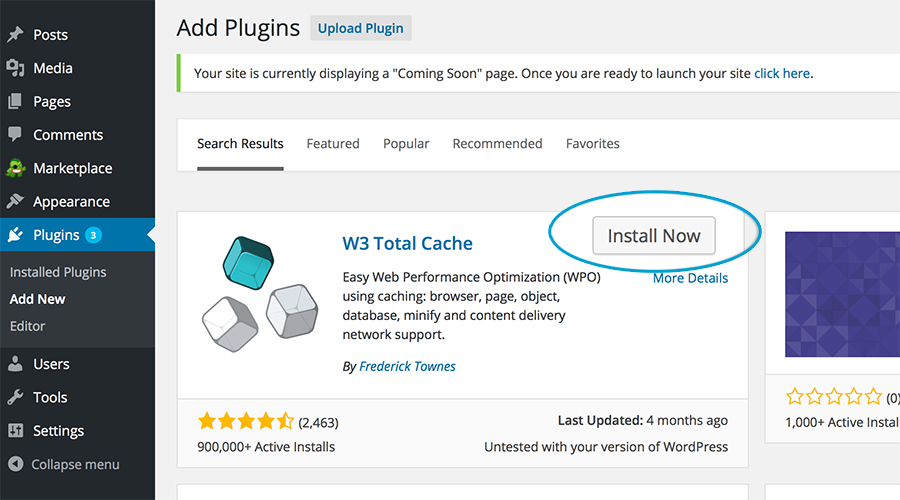
3. Click Install Now
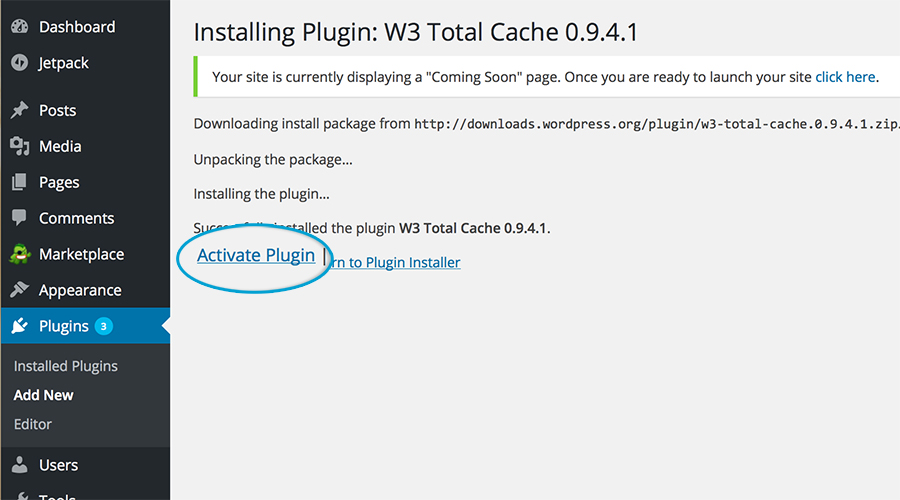
4. Once installed successfully, click Activate.
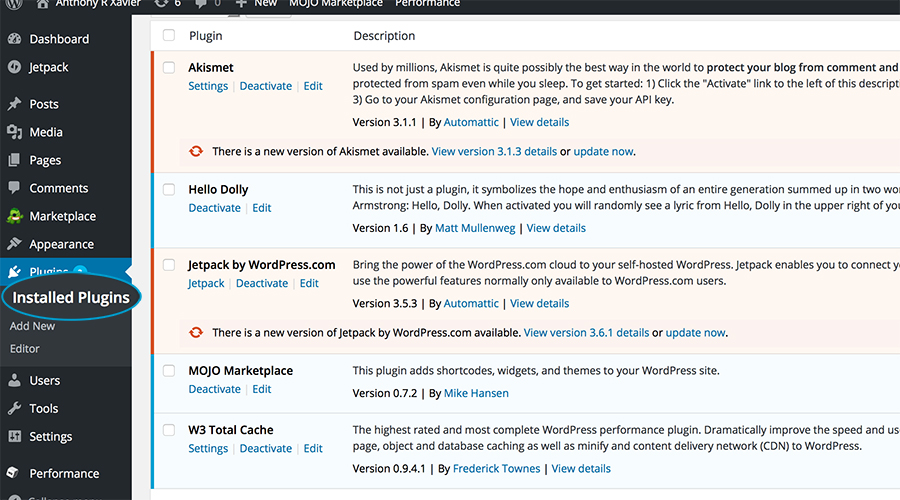
5. To view a list of your installed plugins and their settings, click Plugins » Installed Plugins.
Okkkk now that I’ve almost written a novel, that’s the end of it! 🙂 Practice playing around in your new WordPress site and stay tuned for next week’s post about custom themes and creating the overall brand look of your blog!
As always leave your questions in the comments and I will try my best to answer.
Happy Blogging!
xx Brittany
